Tuesday, March 22, 2011

Less is More # 7

I've struggled with this week's Less is More challenge to make a clean and simple, masculine card. My collection of stamps does not include any of the cars, boats, golf clubs, or tools I have admired on so many of the cards already submitted this week. The only stamps I had that seemed masculine were trees and leaves.


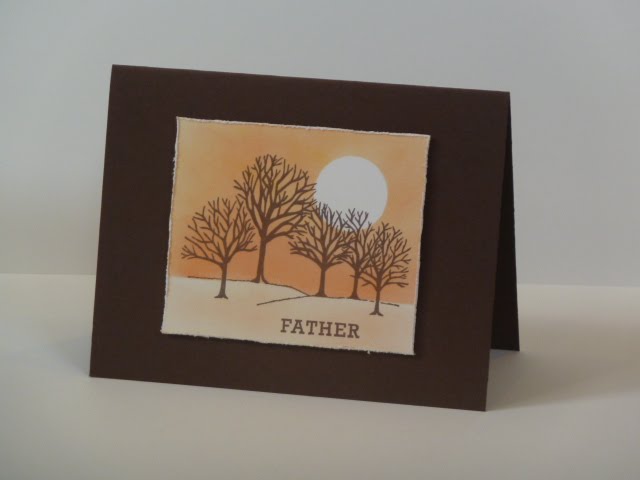
For this card, I masked a circle and ground and then sponged yellows and oranges across the sky. I stamped my trees in brown and added a touch of color to the ground. I really couldn't decide exactly what to do with the ground. I tried some darker colors and shadows, but wasn't pleased with the results. If anyone has suggestions, I'd love to hear them! :)

I wanted to give it a little button and twine treatment, but alas I have no twine and ribbon seemed too girly. I think a shopping trip may be in order. Instead, I used my scissors to distress the edges of the cream cardstock. It's somewhat hard to see in the picture, but I really do like the roughed up edges. I popped the image up on pop dots. I tried several placements, as pictured below, but I think I prefer the one above.


Supplies:
Stamps: Rubber Stampede Winter Trees, PTI Mega Mixed Messages
Ink: Memento Rich Cocoa, ColorBox Paintbox Brights
Paper: PTI dark chocolate, vintage cream

Saturday, March 19, 2011

Make It Monday 6 and FTL 132

I finally got around to doing the Make It Monday 6 at Capture the Moment, which focuses this week on partial embossing. I decided to combine it with this sketch from the Clean and Simple Stamping blog.


Instead of using a patterned paper for the bottom of the card, I embossed it with the lower portion of the Cuttlebug Bird Call embossing folder. I used PTI Floral Frenzy for the flowers. One of the reasons I bought this set, besides really liking it of course, is that it can be used with the Cuttlebug flower dies that I already had. Love that!


Supplies:
Paper: PTI white card base
Stamps: PTI Floral Frenzy, Mega Mixed Messages
Ink: ColorBox Paintbox Brights
Other: Cuttlebug flower dies, Cuttlebug Bird Call embossing folder, Offray ribbon

Friday, March 18, 2011

CPS Sketch # 209

This week I was introduced to the CPS Sketch Challenges. I typically play along with the Less is More challenge and the One layer Wednesday challenges at Simplicity and Styles Inc., so this is quite different from the clean and simple, often one-layer designs I have posted up to now.

Like most scrapbookers and card-makers, I do love beautiful papers, and I recently picked up a Memory Makers paper pad on clearance called English Garden. The beautiful designs with flowers and fruit remind me so much of my grandmother who passed away a few years ago. I wanted to use the papers for my Mother's Day cards, and decided this week's sketch at CPS would be perfect.

Here is the sketch:


And here are the two cards I made:


I'm really pleased with how these turned out. I don't have any Mother's Day sentiments, so I designed my own on the computer as I do most years. I also made my own frame to print the sentiment on. It seemed too stark and white, so I sponged VersaMagic wheat along the edges. I think it looks better against the slightly aged and old-fashioned appearance of the paper.

Thanks for visiting!

Supplies:
Paper: PTI white card base, Memory Makers English Garden
Ink: Versamagic wheat for sponging

Thursday, March 17, 2011

OLW 45

The theme for this week's One Layer Wednesday at Styles Ink was inspired by Jennifer's recent trip to Pennsylvania Dutch country. We are challenged to make a one-layer card inspired by Pennsylvania Dutch Hex signs. It was fun to read about hex signs and the special meanings of the symbols used.

I didn't think I would be able to do this one, but I started poking through my stamps and pulling out all the little pieces that I thought might work. It was fun to play with the stamps, putting them together in different ways trying to find a design that worked.

I have to say that the hard part for me was stamping the design on the finished card. It took five tries to get everything lined up, and it's still not quite right, but I had to call it good and take my bleary eyes to bed!


This morning I decided one of the rejects wasn't terrible if you didn't look too closely, so I cut it out and matted it on red cardstock. It's not one-layer, but at least I saved a piece of paper from the recycle and got more than one card for my efforts!


Supplies:
Ink: Dewdrop Brilliance rocket red, Mediterranean blue, pearlescent ivy
Stamps: PTI Floral Frenzy (daisy, leaf), Rubber Soul (circle), Fiskars Friendship Garden (tulip)
Paper: PTI White

Monday, March 14, 2011

Less is More Week 6

The challenge this week at Less is More is to make a one layer card with the theme "off the edge." Additionally, no scoring is allowed.

I used PTI Floral Frenzy to stamp flowers in two corners. Then I used a fine point Sharpie to draw a box. I followed Susan Rahaila's suggestions from the Simplicity blog. My lines NEVER look as neat and clean as hers do, but I keep trying! :) I stamped a sentiment from PTI's Mega Mixed Messages inside the box.


I experimented a bit with different color combinations. I like the yellow and orange best.

Supplies:
Stamps: PTI Floral Frenzy, PTI Mega Mixed Messages
Ink: All Memento except for the orange, which is Colorbox
Paper: PTI

Wednesday, March 9, 2011

OLW 44

Well, this was fun! When I saw that the One Layer Wednesday on Simplicity was to be inspired by Marta's boards on Pinterest, something I had never even heard of, I decided to take a quick look around.

This picture jumped out at me right away, and the colorful lanterns reminded me of the polka dotted card I had made earlier this week for the Less is More pastel challenge. I was curious to see if I could recreate that card as a one-layer card using the color scheme in the picture.


I used hot pink, light pink, and orange for the polka dots. I tried using red but it just seemed to overpower everything else. One thing I noticed in the picture on Pinterest was that while the lanterns were red/hot pink, pink, and orange, turquoise blue was used as an accent on the table below. I stamped my sentiment in blue, thinking it would stand out better amongst the pink and orange polka dots.

I masked the sentiment and used post-it notes to mask a rectangle around it. Then I just randomly stamped my dots. Although I'm quite pleased with how it turned out, I'm still a little bit partial to the one with layers and the popped up sentiment. It was a fun challenge, though, to puzzle out how to recreate a layered card using only one layer.


This card, based on this picture on Pinterest, did not turn out quite as well. I'll probably have another go at it before the week is out. Unfortunately, right now I have laundry to fold and dinner to make.

Supplies:
Paper: PTI white
Ink: Memento Rose Bud, Versa Magic Pixie Dust and Sea Breeze, Color Box orange
Stamps: Rubber Soul Dot, Hero Arts Three Messages

Monday, March 7, 2011

Less is More Week 5

This week at Less is More, they gave us the challenge of using pastels. While I often reach for more natural and subdued colors, I just happened to buy a pack of chalk inks in spring pastels a couple of weeks ago, so this was the perfect opportunity to use them.

I made several failed and frustrating attempts before realizing that what I really wanted to do was use all four colors on a card! What to do?

I pulled out my small dot stamp, and stamped a random polka dot background across a piece of white paper. Then I gave it a very thin mat in a matching blue. On a separate piece of paper I stamped a Hero Arts sentiment and carefully cut out around the frame. I mounted the sentiment on pop dots for added dimension.


When I finished this card I literally jumped for joy. Silly, I know, but it's a very happy card. And isn't it great when you have an idea that actually translates well to paper and ink?

Supplies:
Stamps: Hero Arts Three Messages, Small dot from Rubber Soul
VersaMagic Chalk Inks: spring pansy, sea breeze, aloe vera, pixie dust
Paper: PTI White, blue from scrap box

Sunday, March 6, 2011

Make it Monday 4

I'm just squeaking in for Make-It Monday at Capture the Moment. This week's technique was to use fun foam. I have oodles of the stuff in my kids' craft bins, yet I have never thought to use it on a card. I take that back. My kids have made many cards with craft foam; I have not.

Some of the cards that have been linked up are very elegant (who knew that craft foam could be elegant?), but kids' cards are what came to my mind. I made a simple boy birthday card in blue, green, and white. The number and the scalloped circle are cut out of green foam. I had planned to use orange, but the green was in better condition.


Simple. Easy. Just right for a little boy's birthday. My girls could do this themselves.

Supplies:
Paper: PTI White, PTI enchanted evening
Other: craft foam from stash, Cuttlebug for embossing, number die

Wednesday, March 2, 2011

OLW 43

Shimmer, not glitter or bling. That's the challenge this week for One Layer Wednesday 43 at Simplicity.

I have one little tub of pearly white twinkling H2Os that I used quite a number of years ago on my Christmas cards. I was considering using Memento Brilliance pearlescent ink, but I decided to use my little tub of twinkling H2Os because truthfully, it hasn't seen the light in at least 5 years! :)

Previously, I had used it to paint a dove in a "Peace on Earth" stamp, so I suppose Christmas was on the brain. Because the pearly white shimmer makes me think of snow, I pulled out one of my oldest stamps, an All Night Media snowman that I have had for at least 14 years.

For the first try, I stamped the snowman up high on the card, colored the scarf, hat, and carrot nose with prismacolor pencils, and then painted the H2Os on the body. I drew a hill with my Sharpie to ground it. I masked the snowman and a rectangle around it and sponged with pale blue ink. Finally, I added a sentiment.


It was okay, but I wasn't loving it. I decided that I liked the look of the snowman better down toward the bottom of the card. It looked more natural to me. I redid the whole thing in that position and just skipped the masking and sponging. I was happier with this result, although now as I look at this post I keep going back on forth as to which I prefer. :)


Usually by the time the first of December rolls around, I haven't made a single Christmas card. Between this and Susan's previous Christmas challenge, it's nice to have a head start!

Supplies:
Stamps: All Night Media snowman, Hero Arts sentiment
Ink: Stazon black, Versamagic Aspen Mist for sponging
Paper: PTI white
Other: twinkling H2Os, Prismacolor pencils